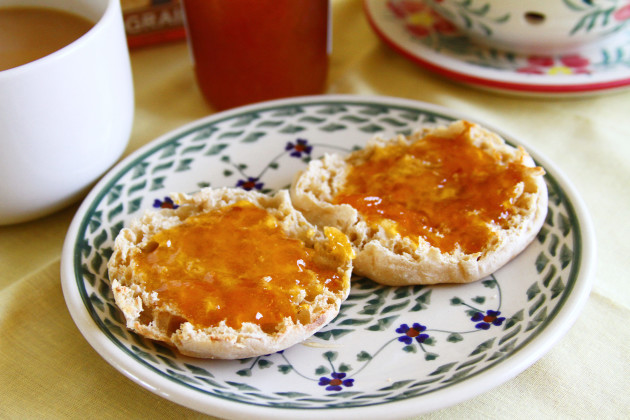
 As summer winds down and a slight chill creeps into the air to mark the beginning of autumn, you can usually find me hovering over the stove in the kitchen, working to preserve the last of summer's bounty. Throughout August my focus is usually on preserving pickles, blackberries, and sometimes even early apples - but stone fruits such as peaches, plums, and apricots are abundant as well. This simple apricot jam is one of my favorites, because I love to use it as a glaze for fruit tarts and other desserts throughout the winter and the holiday season. It is equally delicious on its own simply spread on toast or a biscuit - or, to jazz it up a bit, add about a third a cup of Amaretto to the pot with the apricots and lemon juice. In fact, if you love the idea of boozy jam, please don't miss my Cherries Jubilee jam made with Kirsch brandy! Apricot Jam RecipeIngredients
Directions
via Food Fanatic http://www.foodfanatic.com/2013/08/apricot-jam-preserving-summers-sweetest-stone-fruit/ | |||
| | |||
| | |||
|

Friday, August 30, 2013
Apricot Jam: Preserving Summer's Sweetest Stone Fruit
How To Make Chicken Stock in the Pressure Cooker — Cooking Lessons from The Kitchn
|
Making chicken stock is one of the top reasons why many people own and love their pressure cooker. Not only will a pressure cooker help you to make a big pot of stock in just about 1 hour, it will likely taste richer and more fully flavored than the slow-simmered version, too. Read on for our favorite way to make chicken stock in the pressure cooker.
Bones plus MeatOne of the more satisfying aspects of making chicken stock is its economy since stock is a fantastic way to use up leftover bones and trimmings. Just store them up in a heavy-duty plastic bag the freezer until you have about three pounds worth. That said, the meat of the chicken does add extra flavor, so it's a good idea to pop in a whole, raw drumstick or two (drumsticks are dark meat and dark meat has more flavor). I like to brown any uncooked chicken pieces for my stock to add additional depth of flavor and color. Note: apparently, the Maillard Reaction can occur in the pressure cooker despite the fact that it is a super-moist environment. This is due to the fact that the PC can raise the boiling temperature above 212°F and into the range where the Maillard Reaction can occur. Because of this, some people skip the browning process altogether and I have noted it as optional on the recipe.
Adding AromaticsWhen I make stock, I tend to keep it as simple as possible, as often I am making a big batch for the freezer and I want it to be versatile. The aromatics in this recipe can't be detected on their own, but taken all together, they offer a supporting role to the chicken. This recipe includes carrot and onion but not celery (I find that celery flavor just disappears in the pressure cooker). The garlic is optional but I like it for its mellow sweetness. The peppercorns add a little savory punch and I drop in a few bay leaves for their subtle aroma. The lemon is there to balance out the sweetness a little and a little bit of salt pulls everything together. Do not cut the vegetables into small pieces as they might disintegrate and cause a cloudy stock. The pressure cooker can handle larger chunks of vegetables, so just quarter the onion and cut the carrot into large 3-4" chunks. The garlic can stay whole — just smash it slightly. One thing to note here is that while I'm calling this a stock, in strict classic French cuisine terms, it's actually a seasoned broth. In a home cooking (that is, non-restaurant) environment, the terms are fairly interchangeable, and I find that a fully-flavored broth is more versatile for our kind of cooking. Here's a little more about the difference between the two, if you're interested: What's the Difference? Stock vs. Broth. Is Organic Necessary?I only use sustainably-raised meat these days, so the question of organic is moot for me. But if you're inclined to buy the cheapest factory-raised chickens you can, I would advise you to be careful here. When making stocks, you are boiling the essence out of your ingredients — even more so with pressure cooked stocks since pressure cooking brings liquid way over the temperature for boiling (212°F), usually as high as 250°F. Here's a little exercise: after making pressure cooked chicken stock, take a close look at the bones. They will likely be soft and crumbling, close to being dissolved. Now, after seeing that, don't you want the healthiest, most chemical-free chicken you can get? (This goes for your vegetables as well!) If price is a concern, keep an eye out for sales and freeze until needed. More on the EconomicsSince I didn't have any chicken bones and scraps saved up to make my broth for this post, I purchased three pounds of good, organic chicken drumsticks at Whole Foods, which were on sale for about $2 per pound. I got 3 quarts of broth from this batch, meaning I now have a freezer full of delicious, organic chicken broth for a little over $2 a quart. That's more economical, more delicious, and way more sustainable than any canned or boxed broth I can purchase in the store. When you include straining, ladling, and clean up, I would say the whole process took about 1 1/2 hours, with more than half of it hands off while the pressure cooker was doing its work. The Pressure Cooker VariationsI used my large 8.5-quart Fissler pressure cooker for this recipe as I wanted to make a lot of stock to store in my freezer. You can make this with a smaller pressure cooker but it will take roughly the same amount of time to make the smaller quantity (maybe a little less to bring up to high pressure and to release the pressure after cooking). See the Recipes Notes for adjusting the amount to make 2 quarts in a 6-quart pressure cooker. If you have an electric pressure cooker, simply consult your manual and adjust the directions to suit your particular make and model.
A superior, delicious chicken stock can be had in less than one hour! How To Make Chicken Stock in the Pressure CookerMakes 3 quarts What You NeedIngredients Equipment Instructions
Recipe Notes
Want more smart tutorials for getting things done around the home? (Images: Dana Velden) via Recipe | The Kitchn http://feeds.thekitchn.com/~r/thekitchn/recipes/~3/VV7hWwJKa8c/story01.htm | |||
| | |||
| | |||
|


