Friday, August 31, 2018

Instant Pot Chicken Taco Soup Recipe

Instant Pot Chicken Taco Soup Recipe

Ingredients

  • 1 pound Boneless Skinless Chicken Breast, fresh or frozen (450g)
  • 1 Red Pepper, seeded and chopped
  • 1 small Onion, chopped (about 1/2 cup)
  • 2 cups Corn, (I used frozen)
  • 1 pepper Jalapeño, seeded and chopped fine (optional)
  • 5 cups Chicken Stock
  • 2 cloves Garlic, minced
  • 1 teaspoon Chili Powder
  • 1/2 teaspoon Cumin
  • 1 1/2 teaspoons Salt
  • 1 teaspoon Black Pepper
  • 1 Lime, juiced
For Serving:
  • Fresh Cilantro, torn
  • Sour Cream
  • Shredded Cheddar Cheese
  • Tortilla Chips, crumbled

Directions

  1. Place all the soup ingredients in the Instant Pot. Secure the lid and make sure the valve is in the sealing position. Cook on high pressure, 18 minutes for frozen chicken, 15 minutes for fresh chicken. Let the Instant Pot naturally release for 10 minutes, then quick release any remaining pressure.
  2. Remove the chicken from the Instant Pot and shred it with 2 forks (or you can do this right in the Instant Pot if you like). It should shred very easily. Return it to the Instant Pot and stir the soup to combine everything.
  3. Serve immediately with cilantro, sour cream, cheddar cheese and taco chips for garnishes.
  4. Soup can be stored in the refrigerator for 2-3 days, or can be frozen for 2-3 months.

Notes

  • You can use fresh or frozen chicken in this recipe, it just changes the cook time by a few minutes. I also have instructions for making this chicken taco soup in a slow cooker instead - you can find that recipe cited as the source.

Recommended

Source: Adapted from Slow Cooker Chicken Taco Soup


via Food Fanatic https://ift.tt/2PoS4q9
RSS Feed

Food Fanatic


Unsubscribe from these notifications or sign in to manage your Email Applets.

IFTTT

Thursday, August 30, 2018

How Long Does Bacon Last?

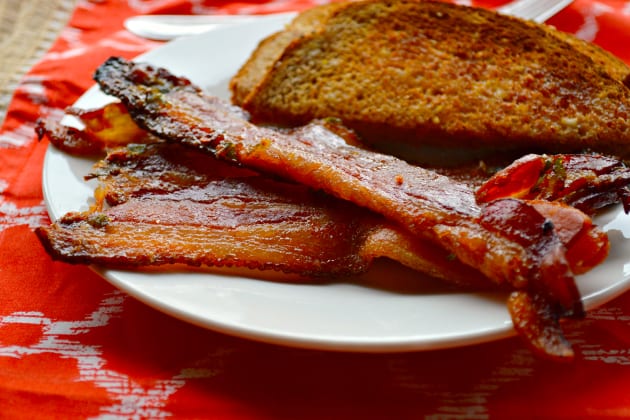
Most of us have been there: We buy a package of bacon for breakfast or a recipe, then only use half of it. 

We stash the opened package, perhaps enclosed in a resealable plastic bag, in the fridge. Then, we forget all about it.

Or you make bacon and boiled eggs and wonder how long they'll last.

Brown Sugar Jalapeño Bacon Photo

Days go by.

Suddenly, we have a taste for bacon with our pancakes or scrambled eggs.

That opened package though…is it still good? Can we safely cook the bacon?

Or what about when we completely forgot we had a new package of bacon…and now it's past the expiration date. Is it still good?

Brown Sugar Jalapeño Bacon Pic

How Long Does Unopened Bacon Last in the Fridge?

The United States Department of Agriculture (USDA) recommends using unopened bacon within seven days of purchasing it. If that's too strict for you, make sure to use or freeze the bacon within the "use by" date on the package.

Brown Sugar Jalapeño Bacon Image

How Long Does Bacon Last After You Open the Package?

If you have an opened package of bacon in the refrigerator, you should use it within a week (if it's before the expiration date). You could freeze the bacon if needed.

Brown Sugar Jalapeño Bacon Picture

How to Freeze Bacon

You can freeze the entire package of unopened bacon if you plan on using all of it at once when thawed. Otherwise, you can freeze raw bacon individually by rolling each strip into a coil.

Place the rolled-up bacon onto a wax-paper-lined or parchment-lined baking sheet. Freeze for 30 minutes.

Transfer the frozen coils of bacon to a freezer bag. Take out one or more as needed.

To freeze cooked bacon, lay the strips on a wax-paper lined baking sheet and cover with more wax paper. Freeze for 30 minutes before placing the strips in a freezer bag. For best quality, use the bacon within four months, but it will remain safe indefinitely.

Maple Bacon Donuts Image

Storing Cooked Bacon

If there is such a thing as leftover bacon in your household, you can store it in the refrigerator for up to a week or freeze it as described above.

Maple Bacon Donuts Pic

Storing Bacon Grease

Did you know you can save bacon grease for use again? You'll need to discard any remaining bits of meat though, since they'll burn if cooked again.

Once your bacon is cooked, strain out the solid bits by pouring the drippings through a sieve and into a metal container. If you want to use a glass jar, make sure the grease is no longer hot, so the glass doesn't shatter.

Store bacon grease in the refrigerator for at least a month. You can use it in place of oil or butter when cooking.

Planning a dinner party and need some inspiration?

How about looking for a new slow cooker dinner idea?

We've got you covered in our ever-growing Facebook group! If you're not a member yet, why not?!

Facebook!

We're chatting cooking techniques, dessert ideas, and everything in between. If you're already a member, invite your friends to join us too!


via Food Fanatic https://ift.tt/2NxdHE8
RSS Feed

Food Fanatic


Unsubscribe from these notifications or sign in to manage your Email Applets.

IFTTT

How to Cook Bacon

Everything's better with bacon, right?

Bacon is a type of salt-cured pork that's usually smoked before you buy it. Its high fat content brings tremendous flavor.

Brown Sugar Jalapeño Bacon Photo

Whether you want some strips to go with your scrambled eggs, bits to mix in your pasta, or crumbles to add to your dip, it's important to know how to cook bacon! We're going to cover various ways to do that.

But, whether you use a stove or oven, did you know it's best not to preheat it before adding raw bacon? Bacon needs to cook slow, so the fat renders out gradually and produces an even result.

Brown Sugar Jalapeño Bacon Image

How to Cook Bacon on the Stove

  1. Add bacon strips in a single layer, to an ungreased, unheated pan on the stove.
  2. Cook over low heat, turning over with tongs when the bacon starts to curl.
  3. Continue flipping over the bacon as needed to brown and crisp both sides.
  4. Place cooked bacon on a paper-towel-lined platter to absorb the grease.
  5. Store leftover bacon in the refrigerator for up to a week or freeze it for up to three months.
Brown Sugar Jalapeño Bacon Pic

How to Cook Bacon in the Microwave

  1. Line a microwave-safe plate with two layers of paper towels. Place bacon strips in a single layer on the paper towels. Cover with two more layers of paper towels.
  2. Cook the bacon for 3-4 minutes, until just cooked through. Wear oven mitts when removing the plate from the microwave, as the dish will be very hot.
Crack Dip Pic

How to Cook Bacon in the Oven

Cooking bacon in the oven is perfect for a large batch.

  1. Line a baking sheet with foil for easier cleanup. Parchment paper also works well.
  2. Lay the bacon slices out in a single layer on the prepared baking sheet. For crispier bacon, you can place a cooking rack on your baking sheet and place the bacon on the rack, so the air will circulate around it.
  3. Place the bacon in a cold oven and then heat it to 400 degrees F. Bake for 25-35 minutes, depending on how crunchy you like your bacon. Thicker bacon will take longer than thin.
  4. Lay the bacon on a paper towel-lined platter to drain and cool.
Crack Dip Image

How to Save Bacon Drippings

Did you know you can save bacon grease for use again? You'll need to discard any remaining bits of meat though, since they'll burn if cooked again.

Once your bacon is cooked, strain out the solid bits by pouring the drippings through a sieve and into a metal container. If you want to use a glass jar, make sure the grease is no longer hot, so the glass doesn't shatter.

Store bacon grease in the refrigerator for at least a month. You can use it in place of oil or butter when cooking.

How to Get Rid of Bacon Grease

Never pour bacon grease down your drain, or it will eventually clog your pipes. Let the grease solidify at room temperature or the refrigerator, then toss it in the trash.

Now that you know how to cook bacon, try making Brown Sugar Jalapeno Bacon, Bacon Peanut Butter Banana Bread or this Paleo Butternut Squash and Bacon Soup. Enjoy!

Planning a dinner party and need some inspiration?

How about looking for a new slow cooker dinner idea?

We've got you covered in our ever-growing Facebook group! If you're not a member yet, why not?!

Facebook!

We're chatting cooking techniques, dessert ideas, and everything in between. If you're already a member, invite your friends to join us too!


via Food Fanatic https://ift.tt/2MIiTZL
RSS Feed

Food Fanatic


Unsubscribe from these notifications or sign in to manage your Email Applets.

IFTTT

How to Make Poached Eggs

In our pursuit of all things "eggcellent," we're going to talk about poached eggs today.

We've covered hard-boiled eggs (and how long they last), soft-boiled eggs, scrambled eggs, deviled eggs and omelets. You may never need to go out for breakfast again.

Soft Boiled Eggs Photo

Just kidding.

But what exactly are poached eggs, anyway?

You've probably seen pictures of them on Instagram featuring runny yolks and the requisite observation, "That egg though."

A poached egg features solid whites enclosed around a soft, runny yolk. It's achieved by gently simmering the eggs in a small amount of water.

Cheesy Grits Picture

How to Make Poached Eggs

  1. Fill a sauce pan with a couple inches of water and place it over medium heat on your stove.
  2. Add a pinch of salt to the water.
  3. If desired, add a couple teaspoons of vinegar to help the egg whites solidify.
  4. Crack a fresh egg into a saucer (use one saucer or cup per egg.)
  5. If making just one or two eggs, when the pot is gently simmering, use the handle of a spoon to get the water swirling in one direction.
  6. Slide one egg at a time into the gently simmering pot.
  7. Turn off the heat and cover the pot for five minutes without lifting the lid to check on the eggs.
  8. After five minutes, remove the lid and use a slotted spoon to lift each poached egg out of the water and onto paper towels to drain.
  9. Serve immediately.
Sweet Potato Burrito Bowl Picture

How to Make Poached Eggs in the Oven

If you're serving several people, consider making poached eggs in the oven using a muffin pan.

  • Heat your oven to 350 degrees F.
  • Place a tablespoon of water in each muffin cup.
  • Add an egg to each muffin cup.
  • Bake for 12-13 minutes. The eggs will continue to cook after being taken out of the oven.
Fresh Eggs Photo

How to Poach an Egg in the Microwave

Fill a mug halfway with water and a couple drops of vinegar. Crack an egg into the water. Cover the mug with a plate and microwave on high for a minute, or until the whites are cooked.

Fresh Eggs Picture

How to Serve Poached Eggs

Enjoy!

Are you tired of the dinner routine?

Stuck in a rut or looking for fun new recipes to try?

Our Facebook Group is growing every day! If you haven't joined yet, we invite you to come check it out and join the fun.

Facebook!

You can ask for recipe ideas, talk about cooking techniques, or get help figuring out the right new pan set for you. If you've already joined, invite a friend along!


via Food Fanatic https://ift.tt/2PlTIJ5
RSS Feed

Food Fanatic


Unsubscribe from these notifications or sign in to manage your Email Applets.

IFTTT

How to Peel a Hard-Boiled Egg

Raise your hand if you love hard-boiled eggs but can't stand peeling them.

Us too! But, we won't let that stop us from making deviled eggs, potato salad or even plain hard-boiled eggs for salads, right?

How to Hard Boil an Egg Photograph

So, what's the secret to easily peeling hard-boiled eggs?

It has more to do with the egg than anything else. It's best to boil eggs at least a week old, because they're easier to peel than fresher eggs.

Then, you can choose from a variety of methods to remove those shells. We've rounded up all of them for you!

How to Hard Boil an Egg Image

How to Peel a Hard-Boiled Egg

  • Tap, roll, peel: Tap your egg on the counter to crack the shell all over. Roll the egg under your palm on the countertop. Start peeling from the large end.
  • Spoon it: Tap the bottom of the hard-boiled egg on the counter and peel away a bit of the shell where it's cracked. Take a teaspoon and gently slide the back of it under the egg's shell, trying to get under the thin skin. Use the spoon to peel off the shell as you rotate the egg.
  • Crack, roll, submerge: Crack your egg and roll it on the counter. Submerge the egg in cold water while you peel it.
  • Submerge, cover and shake: Add water to a pot or plastic container. Place your eggs inside and cover with a lid. Shake the pot or container.
How to Hard Boil an Egg Photo

Can You Peel Hard-Boiled Eggs the Next Day?

It's perfectly fine to peel hard-boiled eggs up to a week after making them. Keep in mind that hard-boiled eggs need to be stored in the refrigerator and must be used within a week of cooking them.

Fresh Eggs Picture

In fact, it's best to keep the shells on and store the eggs in a covered container, so you don't have to smell their odor every time you open your fridge. If your eggs are peeled, submerge them in a bowl of cold water and refrigerate them for up to a week, changing the water daily.

You might also be asking How Long Do Hardboiled Eggs Last? and we've got a post for that!

Now that you know how to peel a hard-boiled egg, try making Egg Salad with Jalapeños or these Chipotle Bacon Deviled Eggs. And check out this Homemade Easter Egg Dye!

How to Hard Boil an Egg Picture

Are you tired of the dinner routine?

Stuck in a rut or looking for fun new recipes to try?

Our Facebook Group is growing every day! If you haven't joined yet, we invite you to come check it out and join the fun.

Facebook!

You can ask for recipe ideas, talk about cooking techniques, or get help figuring out the right new pan set for you. If you've already joined, invite a friend along!


via Food Fanatic https://ift.tt/2MCBDJO
RSS Feed

Food Fanatic


Unsubscribe from these notifications or sign in to manage your Email Applets.

IFTTT
Related Posts Plugin for WordPress, Blogger...